Two tone kitchen cabinets are no longer just a design trend, they’re a practical strategy for creating depth, visual interest, and functional zoning in any kitchen. By combining two distinct colors or finishes on upper and lower cabinets (or by island and perimeter), homeowners can break up monotony, highlight architectural features, and personalize their space without a full gut renovation. Whether you’re planning a DIY cabinet painting project or specifying new cabinetry for a remodel, understanding how to balance color, layout, and finish is essential. This guide covers what two toned kitchen cabinets are, why they’re dominating 2026 kitchens, the most popular color combinations, layout strategies for small and large spaces, and a step-by-step approach to achieving the look yourself.
Table of Contents
ToggleKey Takeaways
- Two tone kitchen cabinets create visual depth and functional zoning by pairing contrasting colors on upper and lower cabinets, making any kitchen feel larger and more thoughtfully designed.
- Navy and white or dark lower cabinets with light uppers are the most popular two tone kitchen cabinet color combinations in 2026, offering timeless appeal and practical benefits like hiding wear.
- Two tone black and wood kitchen cabinets blend modern and organic aesthetics by pairing matte black painted lowers with natural oak or walnut uppers for warm contrast.
- DIY two tone cabinet painting costs only $40–$60 per gallon using quality bonding primer and cabinet enamel, making it a cost-effective transformation compared to full cabinet replacement.
- Successful two tone kitchen cabinet projects require proper preparation: cleaning, sanding, priming, and applying at least two coats while allowing 7–10 days for full paint curing before reinstalling hardware.
- Test color samples in your actual kitchen lighting at different times of day to ensure the two tone design balances with your countertops, backsplash, and overall lighting before committing to the transformation.
What Are Two Tone Kitchen Cabinets?
Two tone kitchen cabinets, also called 2 tone kitchen cabinets or two color kitchen cabinets, refer to any cabinetry design that uses two distinct colors, stains, or finishes within the same kitchen. The contrast can be subtle (white and cream) or bold (black and natural wood), but the defining characteristic is intentional differentiation between cabinet groups.
Most commonly, the split happens between upper and lower cabinets. Lower cabinets might be painted a dark navy or charcoal, while uppers stay white or light gray. Another popular approach is island versus perimeter: the kitchen island gets a standout color (forest green, deep blue, or black) while surrounding cabinets remain neutral.
Less common but equally effective: combining painted and stained finishes. For example, two tone black and wood kitchen cabinets pair matte black lowers with natural oak or walnut uppers, blending modern and organic aesthetics. The key is contrast that serves a purpose, zoning the workspace, drawing the eye to a focal point, or simply adding personality to an otherwise uniform layout.
This approach works in kitchens of all sizes. Small kitchen two tone kitchen cabinets can make a compact space feel less boxy by drawing the eye vertically or horizontally, depending on the color split.
Why Two Tone Kitchen Cabinets Are Taking Over Home Design
The surge in popularity of two-tone kitchen cabinets stems from both aesthetic flexibility and practical design benefits. In 2026, homeowners are moving away from sterile, all-white kitchens and embracing color without committing to a single bold hue throughout.
Visual depth and dimension. A single cabinet color can flatten a space, especially in kitchens with limited natural light or low ceilings. Two tone cabinets create layers, making the room feel larger and more thoughtfully designed. Dark lower cabinets ground the space, while light uppers keep it airy, a balance that’s hard to achieve with one color.
Functional zoning. Contrasting the island or a specific cabinet run (like a pantry wall or coffee station) with the rest of the kitchen establishes visual boundaries. This is especially useful in open-concept layouts where the kitchen bleeds into the living or dining area. The island becomes a true centerpiece, not just another row of cabinets.
Cost-effective transformation. For DIYers and budget-conscious renovators, painting existing cabinets in two tones is far cheaper than replacing them. You can refresh tired oak cabinets by painting the lowers a deep color and leaving the uppers light, or vice versa. Material cost for quality cabinet paint runs roughly $40–$60 per gallon, covering about 300–400 square feet depending on porosity and coats required.
Trend longevity. Unlike all-gray or all-navy kitchens that can date quickly, two tone designs offer built-in adaptability. If tastes shift, repainting one set of cabinets is easier than redoing the entire kitchen. This adaptability is why design professionals and homeowners continue to champion the style.
Most Popular Two Tone Kitchen Cabinet Color Combinations
Navy and White
Navy lower cabinets with white uppers remain a top choice in 2026 for good reason: the combination is crisp, timeless, and works in both traditional and contemporary kitchens. Navy blue (such as Benjamin Moore Hale Navy or Sherwin-Williams Naval) adds richness without the severity of black, while white uppers (often in a satin or semi-gloss finish) keep the space feeling open.
This pairing is especially effective in kitchens with butcher block countertops or brass hardware, which warm up the cool tones. Navy also hides wear better than lighter colors on lower cabinets, which take more abuse from spills and scuffs.
In small kitchen two tone kitchen cabinets layouts, navy lowers can visually anchor the space and make it feel more grounded, while white uppers reflect light and prevent the room from closing in. Pair this combination with subway tile backsplash and under-cabinet lighting for a classic yet current look.
Dark Lower Cabinets With Light Upper Cabinets
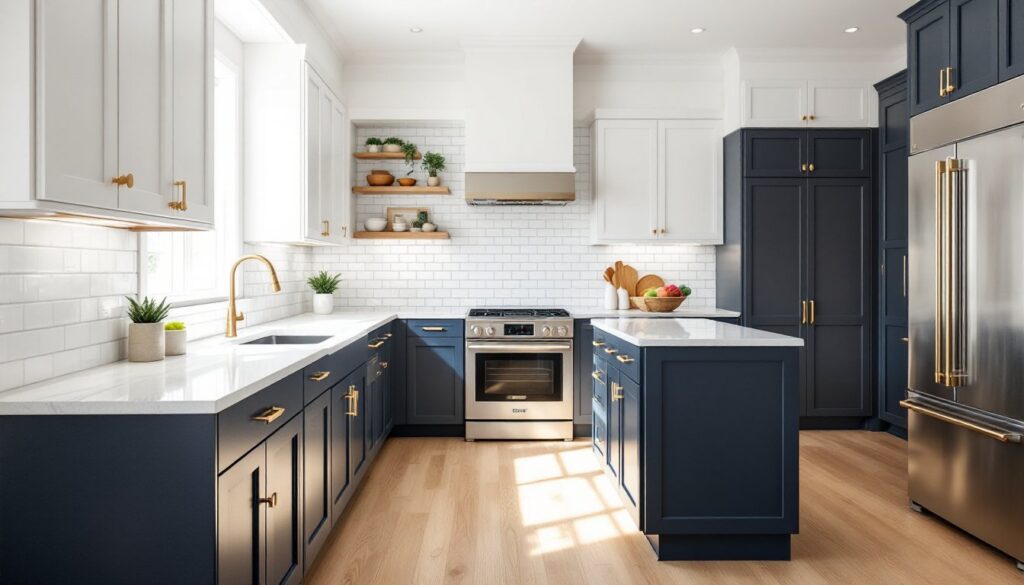
This is the most versatile and widely adopted two tone kitchen cabinets idea. Dark lower cabinets, whether black, charcoal, deep green, or espresso, provide a strong foundation, while light upper cabinets (white, cream, light gray, or pale blue) maintain openness and balance.
Why it works: Dark colors on the bottom half of the kitchen hide dirt, scuffs, and toe kicks. Light colors on top maximize light reflection, critical in kitchens with limited windows or low ceilings. This split also mirrors the natural horizon line, which feels instinctively balanced to the human eye.
Two tone black and wood kitchen cabinets are a standout variation. Black painted lowers paired with natural wood uppers (white oak, walnut, or maple) bring warmth and texture without sacrificing modern edge. The wood grain softens the starkness of black, and the contrast highlights both materials.
For DIY projects, this layout simplifies the painting process: you’re only painting one set of cabinets, leaving the other natural or lightly stained. Just be sure to sand and prime properly, black paint shows brush strokes and imperfections more than lighter colors. Use a high-quality bonding primer like INSL-X Stix or Zinsser B-I-N, and finish with a durable cabinet enamel in satin or semi-gloss. Coverage typically requires two coats, sometimes three on raw wood.
This approach also scales beautifully. In larger kitchens, you can extend the dark tone to the island and a pantry wall, creating a cohesive but varied palette. Remodel galleries and design sourcebooks frequently showcase this layout because it’s both dramatic and livable.
How to Choose the Right Two Tone Cabinet Layout for Your Kitchen
Choosing where to split colors depends on your kitchen’s size, layout, and which features you want to emphasize. There’s no universal rule, but these strategies work consistently:
Upper vs. lower split. Best for galley kitchens, U-shaped layouts, and spaces with standard 8-foot ceilings. Dark lowers and light uppers are the most common, but reversing it (light lowers, dark uppers) can work in kitchens with abundant natural light and high ceilings, though this is riskier and can feel top-heavy.
Island vs. perimeter. Ideal for open-concept kitchens or layouts with a sizable island (at least 4 feet long). Paint the island a bold or contrasting color, keep perimeter cabinets neutral. This draws attention to the island as the kitchen’s focal point and social hub. Common island colors: black, navy, forest green, or deep gray. Perimeter: white, off-white, light gray.
Pantry or accent wall. If you have a floor-to-ceiling pantry cabinet or a bank of cabinets on one wall, treat it as a feature. Paint it a standout color, leave the rest neutral. This works especially well in small kitchen two tone kitchen cabinets projects where a full upper/lower split might feel busy.
Mixing stain and paint. Choose paint for one set, natural wood or stain for the other. This is the signature look of two tone black and wood kitchen cabinets or walnut-and-white combos. Wood on uppers tends to feel more organic and less imposing than wood lowers.
Before committing, test samples in your actual kitchen lighting. Paint large foam boards (at least 2′ x 2′) in your candidate colors and prop them against the cabinets at different times of day. Kitchen design resources and inspiration galleries can help, but your specific lighting, north-facing windows, pendant fixtures, under-cabinet LEDs, will change how colors read.
Consider your countertops and backsplash too. If you have busy granite or a bold tile backsplash, keep cabinet colors simpler. If counters and backsplash are neutral (white quartz, subway tile), you have more freedom to go bold with two toned kitchen cabinets.
DIY Two Tone Kitchen Cabinets: Step-by-Step Installation and Painting Guide
Transforming existing cabinets into a two tone kitchen is one of the highest-impact DIY projects you can tackle. Expect to invest a full weekend (or two) depending on kitchen size. Here’s how to do it right.
Materials and tools you’ll need:
- Deglosser or TSP substitute (Krud Kutter, Simple Green)
- Bonding primer (INSL-X Stix, Zinsser B-I-N shellac-based)
- Cabinet paint (Benjamin Moore Advance, Sherwin-Williams ProClassic, or similar acrylic-alkyd enamel)
- 2″ angled brush and 4″ foam roller (fine nap, ¼”)
- 220-grit sandpaper and sanding block or orbital sander
- Painter’s tape, drop cloths
- Screwdriver, drill (for hardware removal)
- Tack cloth or microfiber rags
- PPE: respirator mask, safety glasses, gloves
Step 1: Remove doors, drawers, and hardware.
Label each door and drawer with painter’s tape and a number corresponding to its location. This saves headaches during reinstallation. Remove all hinges, handles, and knobs. Work in a well-ventilated garage or outdoor space if possible.
Step 2: Clean and degrease.
Wipe down all surfaces with a deglosser or TSP substitute to remove grease, oils, and grime. Kitchen cabinets accumulate cooking residue that prevents paint adhesion. Let dry completely (15–30 minutes).
Step 3: Sand lightly.
Scuff-sand all surfaces with 220-grit sandpaper to break the existing finish and give primer something to grip. You’re not stripping the finish, just dulling the gloss. Wipe with a tack cloth afterward to remove dust.
Step 4: Prime.
Apply a bonding primer to all surfaces you plan to paint. Use a brush for edges and details, a foam roller for flat panels. Primer is non-negotiable, it prevents bleed-through (especially with stained wood), improves adhesion, and reduces the number of topcoats needed. Let dry per manufacturer’s instructions (usually 1–2 hours).
Step 5: Paint the first color.
Start with the color that covers fewer cabinets (often the island or lowers). Apply thin, even coats using the same brush-and-roller technique. Two coats minimum: three for deep colors like navy or black. Sand lightly with 220-grit between coats if you see brush marks or texture. Allow 4–6 hours drying time between coats, longer in humid conditions.
Step 6: Mask and paint the second color.
Once the first color is fully cured (check paint can, usually 24 hours), carefully mask off the boundary if you’re painting adjacent cabinets. Apply painter’s tape along the seam and press firmly. Repeat the priming and painting process for the second color.
Step 7: Cure and reinstall.
Cabinet paint reaches full hardness after 7–10 days, though it’s dry to the touch much sooner. Wait at least 48 hours before reinstalling doors and hardware to avoid marring the finish. Consider upgrading hardware (brushed brass, matte black, or nickel pulls) to complement your new 2 tone kitchen cabinets ideas.
Safety and permits: Painting cabinets doesn’t require a permit, but if you’re replacing cabinets or modifying plumbing/electrical during the project, check local codes. Wear a respirator mask rated for organic vapors when working with oil-based primers or paint indoors. Ventilate thoroughly.
Pro tip: If you’re unsure about color balance, paint the lowers first and live with them for a few days before committing to the uppers. It’s easier to adjust a plan mid-project than to repaint everything.