Installing a video doorbell used to mean running wires through walls and fishing cable through crawl spaces. Not anymore. The Arlo doorbell lineup offers both wired and wireless options that deliver high-definition video, smart detection, and two-way talk without the hassle. Whether you’re upgrading from an old mechanical chime or jumping into smart home security for the first time, Arlo’s systems are designed for DIY installation with minimal tools. This guide walks through everything a homeowner needs to know about choosing, installing, and troubleshooting an Arlo video doorbell or Arlo wireless doorbell, no electrician required.
Table of Contents
ToggleKey Takeaways
- Arlo doorbells offer both wired and wireless options with DIY installation, eliminating the need for an electrician or complex rewiring.
- The Arlo doorbell delivers high-definition video (up to 2K resolution with 1:1 aspect ratio), smart motion detection, and two-way audio communication accessible directly from your smartphone.
- Installation requires checking Wi-Fi signal strength (minimum 2 Mbps upload speed), proper mounting bracket leveling, and correct chime configuration to avoid common issues like ghost ringing.
- Cloud recording and advanced object detection (people, packages, vehicles, animals) require an Arlo Secure subscription starting at $5/month, while local storage via SmartHub offers a subscription-free alternative.
- Common troubleshooting issues like Wi-Fi connectivity, battery drain, and choppy video can be resolved by checking 2.4 GHz network support, adjusting detection sensitivity, and improving signal strength with extenders or mesh systems.
- Arlo doorbell night vision operates via infrared for monochrome footage or color night vision with integrated spotlights, with performance optimized by adjusting IR intensity and avoiding reflective surface placement.
What Is the Arlo Doorbell and How Does It Work?
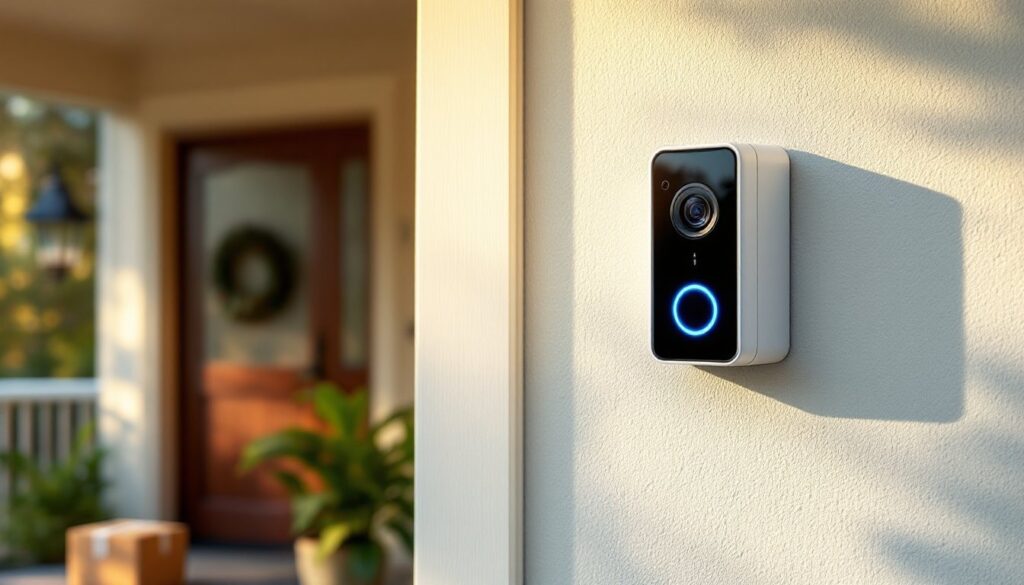
The Arlo doorbell camera is a smart video doorbell that connects to a home’s Wi-Fi network to stream live footage, record visitor activity, and send alerts to a smartphone. It replaces a traditional doorbell button with a camera-equipped unit that captures video in 1080p or higher resolution depending on the model.
Arlo offers two main configurations: wired models that connect to existing doorbell wiring (typically 16-24VAC transformer) and wireless models powered by a rechargeable battery. Both types communicate with Arlo’s cloud servers and integrate with smart home platforms like Amazon Alexa, Google Assistant, and Apple HomeKit (support varies by model).
When someone presses the button, the doorbell triggers a chime (mechanical or digital), records video, and sends a push notification. Motion detection can also trigger recording even if the button isn’t pressed. Footage is stored locally on a compatible Arlo base station or in the cloud via a subscription plan.
The system requires a Wi-Fi connection with 2.4 GHz support (some models also support 5 GHz). Upload speeds of at least 2 Mbps are recommended for reliable streaming. Most installations work with existing doorbell transformer ratings between 16V and 24V AC, which is standard in residential construction post-1990.
Key Features That Set Arlo Doorbells Apart
Video resolution varies by model. The Arlo Video Doorbell 2K offers 2560×1920 resolution with a 1:1 aspect ratio, meaning it captures a full-height view of a person from head to toe, not just their torso. Standard 1080p models use a 16:9 ratio. This matters when you need to see packages at your feet or identify someone’s full outfit.
HDR imaging helps balance bright backgrounds (like a sunny street) with shadowed faces under a porch overhang. Without HDR, visitors can appear as silhouettes. Arlo’s HDR implementation reduces washed-out skies and underexposed faces.
Night vision uses infrared LEDs for black-and-white footage in total darkness, effective up to about 10 feet. Some models include a spotlight or color night vision, which uses ambient light or LED illumination to record in color even after sunset.
Smart detection differentiates between people, packages, vehicles, and animals using on-device AI. This reduces false alerts from passing cars or wandering cats. Detection zones can be customized through the app to ignore specific areas like a busy sidewalk.
Two-way audio includes both a speaker and microphone. Audio quality is clear enough for conversation, though there’s a slight lag (1-2 seconds) typical of internet-connected devices. Pre-recorded quick replies let users respond without speaking, useful when hands are full or in a meeting.
Weather resistance is rated IP65 or better, meaning the unit withstands rain, snow, and dust. Operating temperature ranges typically span -4°F to 113°F, suitable for most climates. In extreme cold, battery performance degrades, wireless models may require more frequent charging below 20°F.
Installation Guide: Wired vs. Wireless Setup
Wired installation connects to existing doorbell wiring. First, turn off power at the breaker, never work on live wiring. Remove the old doorbell button and check the transformer voltage with a multimeter. Arlo wired doorbells require 16-24VAC. If the existing transformer is lower (some older systems run 10VAC), it needs upgrading. A licensed electrician should handle transformer replacement if you’re not comfortable working inside the electrical panel.
Once voltage is confirmed, attach the mounting bracket to the wall using the included screws. If mounting to brick or stucco, use masonry anchors (not included). Connect the doorbell wires to the screw terminals on the back of the Arlo unit, polarity doesn’t matter for AC current. Snap the faceplate on and restore power.
Wireless installation skips the wiring entirely. Charge the battery fully before starting (takes 3-4 hours). Mount the bracket with screws or the included adhesive pad. The adhesive works on smooth surfaces like painted metal doors or finished wood trim: rough surfaces like unfinished brick need screws. Slide the doorbell onto the bracket until it clicks.
Both setups require the Arlo Secure app (iOS or Android) to complete pairing. The app walks through Wi-Fi connection, chime setup, and detection zone configuration. If using a mechanical chime, install the included power kit adapter on the chime box terminals to prevent humming or ghost ringing, this is a common skip that causes issues later.
DIY Installation Tips for Homeowners
Check your Wi-Fi signal at the doorbell location before mounting permanently. Open the app and run a connection test. If signal strength is below three bars, consider a Wi-Fi extender or mesh system. Weak signal causes delayed notifications and choppy video.
Level the mounting bracket with a torpedo level. A crooked doorbell looks sloppy and can affect motion detection angles. Mark screw holes with a pencil, then pre-drill pilot holes with a 3/32″ bit for wood or a masonry bit for brick.
Test before final mounting. Power up the doorbell, complete app setup, and verify video quality and chime function before fully securing the unit. It’s easier to troubleshoot with the device loosely mounted.
Wire management for wired installs: if the existing wires are too short, add 18-gauge doorbell wire (available at any hardware store) using wire nuts. Keep splices inside the wall or behind the mounting plate, exposed connections corrode.
Secure against theft using the anti-theft mount or security screws (included with most models). Battery-powered units are easier to steal than wired ones, so use the locking mechanism.
Arlo Doorbell Performance: Video Quality, Night Vision, and Detection
Video clarity depends on lighting and compression. In daylight, the 2K models deliver sharp footage, license plates are readable up to about 15 feet, and faces are identifiable at the typical doorbell conversation distance of 3-5 feet. The 1080p models are adequate but struggle with fine details like small text on packages.
Frame rate is 15-30 fps depending on bandwidth and subscription tier. Higher frame rates reduce motion blur when someone walks quickly past the camera. The video quality holds up well compared to competitors, as noted in professional testing by home security reviewers.
Night vision performance varies. Infrared mode works reliably but footage is monochrome. If the doorbell has an integrated spotlight, color night vision activates when motion is detected, useful for identifying clothing colors or vehicle details. The spotlight brightness is adjustable in the app: max setting can be glaring for visitors but improves video quality.
Detection accuracy has improved significantly with firmware updates. Person detection reliably triggers on human shapes but occasionally misses partially obscured figures. Package detection works when the camera can see the delivery person placing the box: it won’t detect a package that’s been sitting for hours. Vehicle detection covers cars in driveways within the camera’s field of view, not traffic passing on the street.
False alerts come mostly from headlights sweeping across the camera at night, tree shadows on windy days, or insects flying close to the lens. Adjusting detection zones to exclude the street and sidewalk reduces most false triggers. Activity zones are drawn as rectangles in the app, up to three zones per camera.
Response time from button press to notification averages 3-5 seconds with a strong Wi-Fi connection. Live view takes an additional 2-3 seconds to load. This is fast enough to catch delivery drivers before they return to their truck but not instantaneous.
Subscription Plans and What You Actually Need
Arlo Secure is the subscription service that unlocks cloud recording, smart detection, and extended features. Without a subscription, users get live view, two-way talk, and motion/doorbell press notifications, but no video recording. That’s a significant limitation if the goal is to review footage after an event.
Arlo Secure (single camera) costs around $5/month or $50/year. It includes 30 days of cloud storage, advanced object detection (people, packages, vehicles, animals), and emergency response integration. This tier makes sense for homeowners with only a doorbell camera.
Arlo Secure Plus (unlimited cameras) runs about $13/month or $130/year. It adds 60 days of storage, 24/7 professional monitoring, and theft replacement for stolen devices. Worth considering if adding more Arlo cameras in the future or if extended storage is needed for vacation properties.
Local storage via an Arlo SmartHub is an option for some models. The hub supports USB storage for recording without a subscription, but smart detection features won’t work, only basic motion triggers. The hub costs around $100-150 and requires a wired Ethernet connection to the router.
Comparing costs: ring and Nest doorbells have similar subscription structures, typically $4-10/month per device. Arlo’s pricing is competitive, and the multi-camera plans offer better value for whole-home coverage. Many smart home enthusiasts prefer connected device ecosystems that integrate across platforms rather than locking into a single brand.
Free trial periods usually include 30-90 days of Arlo Secure with new device purchases. Use the trial to evaluate whether cloud recording is essential before committing.
Common Issues and Troubleshooting Solutions
Doorbell won’t connect to Wi-Fi. Check that the router is broadcasting 2.4 GHz (some models support 5 GHz but not all). Restart the router and the doorbell by removing it from the mount or power cycling if wired. If the network name contains special characters, try renaming it to alphanumeric only, some devices struggle with symbols.
Chime doesn’t ring. For wired setups, verify the power kit adapter is installed correctly at the chime box. Mechanical chimes require the adapter to regulate power: without it, the chime may hum or not ring. Digital chimes may need a different power kit or may be incompatible, check Arlo’s compatibility list. Wireless models use the Arlo Chime accessory (sold separately, around $40) or smartphone notifications only.
Battery drains quickly. Cold weather accelerates battery drain. Activity frequency also impacts life, high-traffic areas with constant motion detection can empty a battery in weeks rather than months. Reduce detection sensitivity, narrow activity zones, or switch to wired power if available. Arlo sells a solar panel charger for about $60 that extends wireless battery life indefinitely in sunny locations.
Video is laggy or choppy. This indicates insufficient upload bandwidth or weak Wi-Fi signal. Run a speed test at the router, upload speed should be at least 2 Mbps per camera. If the router is far from the door, install a Wi-Fi extender or upgrade to a mesh system. Powerline adapters can also extend network reach through electrical wiring.
Motion detection misses events. Detection zones may be set too narrow or sensitivity too low. Increase sensitivity in the app and widen zones to cover the entire approach path. If the doorbell is angled to the side rather than facing straight out, detection range decreases, reposition the mount if possible using angled wedges (available as accessories).
Firmware update failures. Ensure the doorbell is fully charged (wireless) or has stable power (wired) during updates. Don’t interrupt the process, it can take 10-15 minutes. If an update fails repeatedly, remove the device from the app and re-add it, then attempt the update again. Contact Arlo support if the problem persists, as some units may require a warranty replacement.
Night vision is too dark. Adjust IR intensity in the app settings. If the porch has no ambient light, add a small LED bulb nearby, even 40 watts helps color night vision modes. Avoid placing the doorbell directly across from reflective surfaces like glass storm doors, which can bounce IR light back and wash out the image. For detailed comparisons of night vision across brands, tech reviewers regularly publish side-by-side tests that can inform purchasing decisions.